|
|
|
Primitives
in 3DS MAX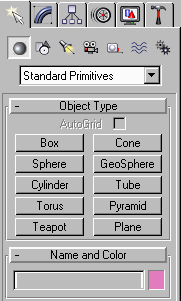
The top row allows you to pick different modules within the program, which are, in order of appearance left -> right:
Creation, Modification, Hierarchies, Animation, Display Settings and Utilities.
The of these (Create) is selected by default. Among the possible choices below it are different classes of elements that can be created. The default selection is "Geometry"; this is another term for "3D objects". The other categories in order of appearance are:
2d Shapes, Lights, Cameras, Helpers, SpaceWarps, and Tools.
When you start the software, the panel should look like it does to the right. If you’ve been experimenting with the different features discussed above, choose the pull-down menu "File / Reset".
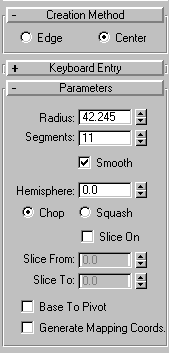
"- Creation Method", "+ Keyboard Entry", and
"- Parameters". These symbols mean that that button is a "rollout" button. Click on the to see what they do. Note that clicking on a "-" bar "rolls up" the section of the panel below it, while clicking on a "+" unrolls a panel section.
Important Hints:
STOP! Go back, and make sure you know about each type of "standard primitive", and how to create and edit each one.
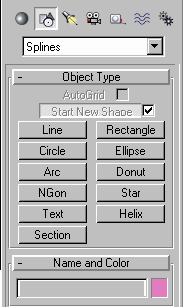
Shapes
 All of the objects created in this section share a common attribute: they are invisible to the camera! They can, however, be used to generate visible geometry through several types of operations.
First, let’s get comfortable with at least one or two types of these spline tools:
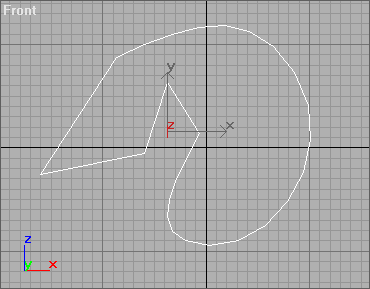
Remember, these shapes are still invisible to the camera. Before we can go any further toward making them into geometry, we need to understand the "modify" Panel.
The "Modify Panel" is accessed by clicking the tab next in line beside the "Create" tab.
This is probably the second most important panel; it is used constantly by most users, because:
Note: In older versions of 3DS MAX (and therefore in many tutorials, which is why I mention it) the "Modify" tab looked different – it was a red "Three Mile Island" gadget with a line through it – go figure.
Before you can use the features of the Modify panel, you need to have one or more objects available to edit:
You might want to quick render (<f9>), to prove to yourself that some objects are visible to the camera, and some are not.
Note: Rendering helps you see what you really have in your 3D world! The four preview windows show only a "preview" or "real time render" of the 3D elements you have created – to see a "real" version at any time, press <f9>. <f9> generates a "quick render" in 3DS MAX (and in Lightwave’s Layout, but that’s another story) – after the "quick render" is displayed, close the resulting window, and get on with your work. Quick render as often as you like.
Clicking on a different view will cause the render to be made in that view. Usually, you will want to render in the perspective view, or through a camera if one is present. Make sure the perspective view is selected, rotate it around so you can see what you have (alt-MMB), and quick render with <f9>.
Close any quick render windows, and let’s get on with it…

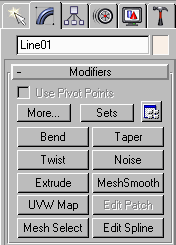
The Modify Panel is divided into three main areas.
made before, and make it a renderable shape. Select
the spline curve object you made a page or two ago (if you don’t have one, go make one, and then return to this step) and then click "Extrude" from the "Modifiers" List near the top of the "modify" Panel.
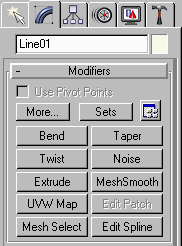
If the extrude tool is not available it is usually because you don’t have a "shape" selected (you can’t extrude geometry), or the button has been "put away" by a previous user. If you don’t see the "Extrude" button, make sure you have a line, ngon, or other "shape" object selected, and if you still don’t see it, look in the "More" list.
Extrude is only one of the many modifiers available in this panel. We will look at a few more, but this is an area you should familiarize yourself with. Try out the various tools – esp. the modeling tools such as bend, taper, noise, MeshSmooth, and so on.
Parametric Stacks Explained
There are two essential philosophies of workflow in 3D design (when it comes to applying changes to a 3D element. These are often referred to as "Parametric" and "Explicit". 3DS MAX is a "parametric modeler", while Lightwave Modeler is an "Explicit Modeler". Er, most of the time, anyway.
What is the difference?
Explicit modelers make changes to models by changing them. ‘Nuff said.
Parametric modelers (eg. 3DS MAX) make changes to objects by storing the request for a change in a "command list" or "history" (in 3DS MAX this list is called a "Modifier Stack"). The commands in the stack are applied "in real time" to the object – this means that you can go back to earlier stages and make changes with ease.
Pluses: Having a parametric stack is like having a better undo/redo feature. For example, say you start with a sphere, and model a head: you get the model half-built, and decide you needed more / less points in your model – you don’t have to throw the model away and start over! Instead, you can simply return to the "sphere creation level" in the stack, and drag the segment slider up; then when you return to the most recent level in the stack, the changes will be magically applied.
Minuses: There are two unavoidable hazards associated with parametric modeling: 1. Overhead. Parameter stacks are interpreted in real time by you computer, and they can become very complex as your model gets more sophisticated. This can greatly reduce productivity if not properly managed -- we'll look at stack management later.
2. Order of application. There are some interesting pitfalls that result from applying modifiers "in the wrong order".
Bottom Line:
Parametric Stacks are cool. From a productivity standpoint, the jury is still out, but they do sometimes come in very handy (when they aren’t getting in the way) by allowing the user to "go back a few steps" and make a change…
On the other hand, Explicit modeling makes for a speedy workflow, and a less temperamental modeler… and this is often worth the minor inconvenience of not having the history stack available…