Would you like to make this site your homepage? It's fast and easy...
Yes, Please make this my home page!
A Simple Tutorial – Setting up a scene in 3DS MAX.
We’ll be setting up a scene for use in the next assignment or two for 3DS MAX. We’ll create a background and a foreground "pedestal" or "table" to rest smaller objects on. We’ll texture and light the scene, and we’ll then add one or more models as "objects of interest" in the scene.
Why? To get an idea of how to compose a shot so it is visually interesting, how to operate the texturing features, and how to set up lights. We’ll also make use of some nifty modeling features.
Establish a set.
Establish a Camera, Texture and Light the set.
Create or import models.
The Set
First and foremost, every 3D scene you render needs a set. Only rarely is the black void we see in the world when we first load 3DS MAX a desirable environment for our projects. Let’s begin by setting up a better background.

First, let’s set up a simple gradient. Click on the "Material Editor" button:
The window shown here should appear. This is the "Material Editor", where we can define the appearance of the surfaces of our objects, or create texturing parameters for various other reasons.
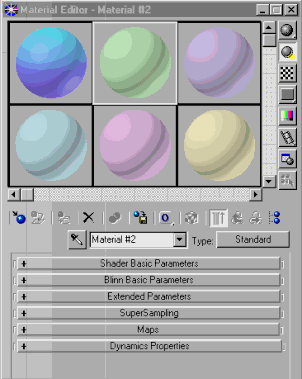
The top part of the window is a shelf where we can store our surface settings. Each sphere is a separate "material". Notice that one square has a white "highlight" box around it – that is the currently selected material.
- The buttons below the sample shelf control file management and navigation in the Material Editor.
- The seven big rollouts offer the zillion settings a material can have. Some will be rolled up when you open the Material Editor, some will not. Check out each rollout to familiarize yourself with the features it hides.
Note: The interface in 3DS MAX often overflows the screen – the Material Editor is one of the most sprawling interfaces in the program. To access unseen parts of the interface, move your mouse over unused parts of the interface until your pointer looks like a hand – then left-click and drag to scroll the interface. This is necessary more often at lower resolutions.
For our needs, all we want to do is create a simple gradient:
- Click on the sample sphere in the upper left hand corner,


This will allow us to apply a basic color texture to the surface.

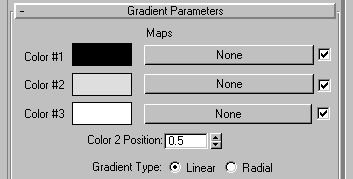
- Click on the first color patch (the black one, and a standard color picker should appear. Choose a nice sky blue. Don’t close the color picker window – just click on the next color swatch in the Gradient Parameters rollout, and pick another shade of blue, and then pick the third swatch, and make it yet another shade of blue. Then close the Color Picker window.
- Now you have created a custom material! To use it, we need simply to pick a destination (something to apply it to – in our case, we’ll apply it to the background environment, but it would be the same procedure to put a surface on an object).
- Leave the Material Editor open, and choose the pull-down menu item "Rendering / Environment…"
- A new window labeled "Environment" will open. Reposition it so that you can see both it and the "Material Editor" window clearly.

- This should return us to the maps rollout shown in step b) above.
- Now left-click and drag from the map button in the Material Editor to the map button in the Environment Editor.
Material Editor Environment Map
- If you’ve followed these steps correctly, the "Environment Map" button in the Environment Editor window should now say something like "Map #1 Gradient".
- Press <f9> to see how it look as a background image for our as-yet empty scene. If the quick render does not have a nice blue gradient background, you missed a step in the past few pages.
SAVE SAVE SAVE. Save often. Call this "Basic_Set_01". Every time you save, add one to the filename (02, 03, etc). SAVE SAVE SAVE.
So, now that we have a gradient background, lets build a nice simple pedestal to act as the central focus in our scene.
 Note: Before you begin, it is important to take note of the status bar area immediately below the main quad view.
What is Going On "Lock Selection" At What Location Grid Size
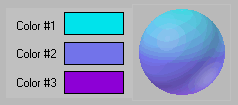
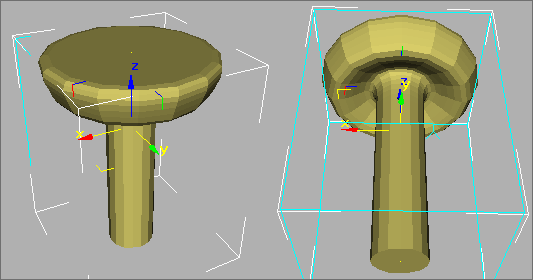
- Choose Create / Splines / Line
- Now in the front view, draw a shape
like the one shown below.
Be sure that you watch the size values in the
status bar, and make your curve about 250 units
tall, like the one shown below.
 This shape is an outline that we will now turn into a solid shape using a feature called "lathe". Make sure the curve is selected, and open the Modify Panel (looks like macaroni).
- Choose "More", and pick "Lathe".

- Look at your object critically. Does it look Ok? Is it possible that it is "inside out"? Not sure? About half of the time, Lathe objects will be "inside out" – their polygons will face the wrong way… Try toggling the "Flip Normals" checkbox to see how it changes your object. Make sure you leave it with the polygons the right-way-out…
Note: The topic of "polygon normals" will definitely appear on a quiz somewhere in life. Get a handle on what they are – thee things really matter when it comes to polygon modeling…
- You should now have a pedestal object something like the object shown here:
- Once you have this done, save again.
Now let’s texture the object.
- Open the Material Editor, and select an unused sample sphere.
- Roll out the Maps part of the editor, and click on the "None" button next to the Bump settings. Choose "noise" as a texture type, and hit Ok. This should return you to the main screen of the material editor with the "noise" texture rollout now open. Adjust the size of the noise, and test render – repeat until you get a noise you like – I used 15 or 20.
 Now go "Up To Parent", and choose the "none" gadget next to "diffuse color". Choose "bricks" as a texture type, and hit "Ok". Tweak the brick settings -- I played around with the Tiling values, and added some noise. Experiment, and get something you like -- then SAVE again.
2. Establish a Camera, Texture and Light the set.
That looks good; now we need a camera. So far, we’ve only used Perspective renders – but 3DS MAX actually supports a "real world" camera model, which is usually what we want to render through – not least because it is easier to avoid accidentally changing the camera settings…
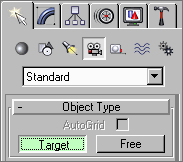
- Now select the camera-add tool.
Choose "Create / Camera / Target".
- In the Top view, click and drag from where you want the camera to be to where you want it to point; i.e. Click in one corner of the Top view viewport, hold and drag to where the pedestal is, and release your mouse.
- Now in the "Perspective" viewport, right-click on the label (the word "perspective"), and select "Views / Camera01". This will turn that viewport into a camera view.

You should find that it is possible to arrange the camera to get a nice shot of the pedestal, but it probably looks a bit flat – the lighting needs attention as well…
- Take a look at the Light setup shown below.
- This is the top view of a simple 3-point lighting setup. The "ambient light" color swatch in the "Environment" window is set to black (or nearly black).
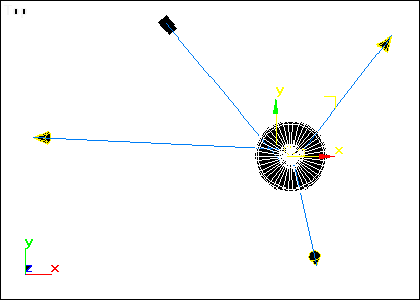
Camera
Fill Light
Main Light
Focus
Back Light
The Main Light is a full-brightness light, which is raised up fairly high – so that it points down to the target at, say, a 45 degree angle.
The Side Light is a much dimmer light which eats the shadow on the opposite side from the Main lights. Notice how it is not lined up opposite the Main light – symmetry in lighting is rarely desirable.
The Back Light is another dim light which acts as a "bounces from floor" light source – it eats up the shadows under the well-lit side of the objects (notice that it is almost opposite the camera, but is nearer to the main light source.
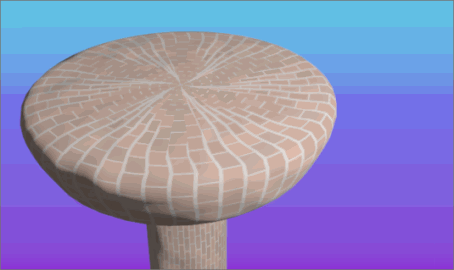
Shown here is the result of a quick light setup as discussed above. This is not a finished render in any sense – you should be able to easily achieve results similar to (but probably nicer) than this without much difficulty. Experiment with the camera, lighting, and even the texturing of your object or the background, until you get a nicely framed shot.