Would you like to make this site your homepage? It's fast and easy...
Yes, Please make this my home page!
You should have a scene called "Basic_Set_06.max" or something like that.
Load it up and…
Note: Three Point lighting, after the style shown in the previous section, is very common in photography and stage lighting - -it is a great starting place, but from here, you will want to study real lighting environments, and experiment to reproduce them. There are many books that can be very helpful -- focal press publishes a whole series of books on lighting… A course in photography is recommended for the enthusiast.
3.Create or import models.
Use one or more of the methods we’ve looked at for model creation to build a small table, texture it as best you can, and position them atop the pedestal in our scene -- and be sure to save it under a new name. This gives us a sort of "stage" upon which to pose future work.
A simple example: Lets make a pencil.
We'll begin by making a cylinder shape for the main part of the pencil:
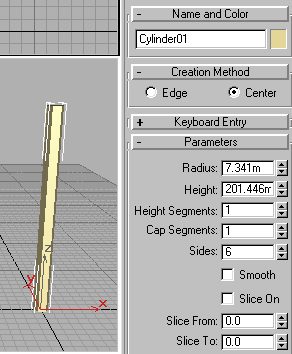
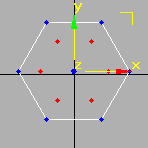
Load / Reset 3DS MAX, and make a cylinder with approximately the proportion shown here.
Rename the object "Pencil" by clicking in the field where it says "cylinder".
Set sides to six, turn smoothing off, and pick a nice yellow color by clicking on the color swatch.
Adjust the Radius and Height features until your object is about the shape of the one shown here.
Great! Now save as "Pencil_01.max".
- Set height segments to "3" -- one segment each for the point, body, and metal jacket / eraser.
- The next few steps rely on the use of an "edit mesh modifier". For those familiar with Lightwave -- this feature gives us a mode similar to Lightwave's Modeler. With the pencil still selected, choose the Modify tab, and select "More" and then choose "Edit Mesh" from the list.
- The "Modifier Stack" area should immediately change to include a new item reading "Edit Mesh". Immediately below it is a rollout reading "Selection" -- see below.
- This area allows us to choose to select (and thus edit) vertices, edges, faces, polygons, or "elements". Pick "Polygon". These modes are very important -- we'll be using them more than once, so take careful note of how you found this tool, and what options are listed.
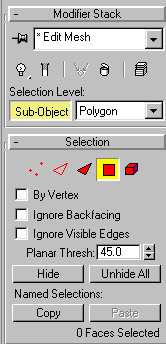
- Once you've selected "Polygon", we can select each section of the object and give it a separate "sub object smoothing group" -- that is we can make those parts of the object smooth differently.
- Select the bottom segment of the tube only (this part will be the point end). The lines on the bottom third of the tube should turn red.
- Scroll to the very bottom of the modifier rollout, and you will see a section labeled "Surface Parameters", as shown below.
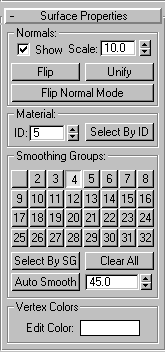
 If you have selected the lower third of the cylinder, you should now see something like this.
 - Now let's apply surface ids. Click on the little slider where the material ID number is shown, and set it to "5". This makes those polygons be identified as group "5" (it would be nice to give them a name, like "pencil tip" -- maybe in a later version of the software).
- Select the polygons at the other end of the object, and give them the material id "6",
- Select the polygons in the middle, and give them the id "7".
- Now check to see if the assignment of ids worked by choosing "Select by ID", and try selecting each Smoothing group to see if each of the three sections is now listed as a separate group.
- If you select group "6" (the pencil tip), and click on the corresponding "6" button in the bank of buttons, that should turn smoothing back on for that part of the object. Experiment with these features, and try get comfortable with how they work.

Now we can make the three parts of the object different colors. Save again, and…
- Open the Material Editor. Move it aside so you can still see your pencil, and select the polygons that make up the "tip" part of the pencil. Now drag from an unused sample ball in the Material Editor to the selected polygons, and when you release your mouse button, the polygons should have that material assigned to them.
- Select each of the other two sections of the cylinder in turn, and apply an unused material sample to each of them.
- You should now have a pencil that looks roughly like the one shown here.
Now we will modify the shape of our object to resemble a pencil a bit better. Close the Material Editor, Save your work yet again (increment the file name -- I'm up to "Tut_Pencil_07.max".
To Reshape our model, we'll make use of another aspect of out "Edit Mesh" Modifier.
 Scroll all the way back to the top of the Modify Panel, and (assuming you still have the pencil selected) click on the "Vertex" edit mode.
 In this mode we can perform operations on individual points in the object, just as we would on whole objects.
- Choose the "Scale" tool from the Main Toolbar at the top of the screen.


- In the Front view, drag a selection marquee around the point at the very tip of the pencil,
- Now in the Top view, click and drag to scale the selected point inward -- drag until they almost merge as a single point in the middle. The diagram shows the points scaled in about half way -- you'll want to go further, to make the point of the pencil.
- Now drag a marquee to select each of the two middle rows of points, and move them up and down along the length of the pencil respectively, to achieve the shape shown here:


 If you have selected the lower third of the cylinder, you should now see something like this.
