|
|
|
Modifiers etc.
In addition to the modeling tools we’ve looked at so far, there are a few other very important features.
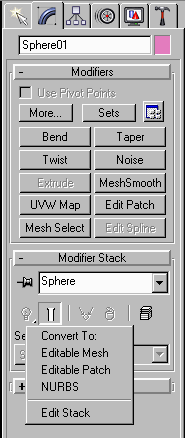
The Edit Stack gadget is used to access various possible features / switch to various modes. Click on it, and the popup shown here appears. This allows the user to either:
1. Convert the selected object to a different object type, or 2. Edit the object’s stack.
Convert To: Editable Mesh is the same as applying an "Edit Mesh" Modifier (which we did last week).
Convert To: Editable Patch turns the object into a "patch" of splines – called a "SubPatch".
Insert Spline Discussion Here
Since splines are normally organized into "quads" (square polygons arranged in rows and columns), it is best to use "box models" like the ones we made when we did the "space ship" models last week.
 Make a cube,
 Scroll down a bit in the roll out, until you see the "Extrude & Bevel" section as shown here.
Convert To: NURBS is 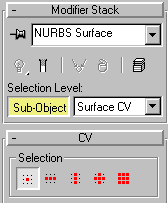 the third and final type of object we can convert to in this list. NURBS are a special type of Splines (Non-Uniform-Rational-B-Splines). Unlike normal splines, NURBS curves do not actually pass through the points in the objects – rather the curves in the objects tend towards the locations of the points. To illustrate this, it is probably bets to make two boxes side by side, and convert one to Splines, and the other to NURBS. Then drag the knots / CVs of each one around to see how this works.
![]() To access the points of your object in NURBS mode, use the "Selection Level" activation button / drop down shown here to choose "Surface CV". The points ("CVs") are then accessible. Note that the NURBS tool is a bit more limited in terms of "face" editing tools – there are no such tool available. There are, however, some really powerful modeling tools available via the "NURBS Creation Toolbox" – the green grid button in the NURBS rollout. This is something for another handout.
To access the points of your object in NURBS mode, use the "Selection Level" activation button / drop down shown here to choose "Surface CV". The points ("CVs") are then accessible. Note that the NURBS tool is a bit more limited in terms of "face" editing tools – there are no such tool available. There are, however, some really powerful modeling tools available via the "NURBS Creation Toolbox" – the green grid button in the NURBS rollout. This is something for another handout.
![]() Edit Stack is the final choice in the popup we get from the Edit Stack gadget.
Edit Stack is the final choice in the popup we get from the Edit Stack gadget.
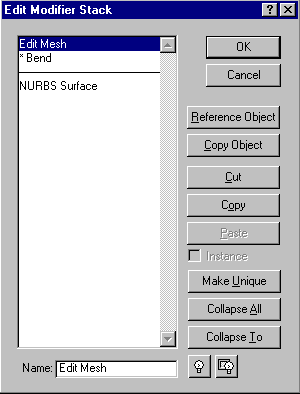 This opens the panel shown here. The most common reason to visit this panel is to "Collapse the Stack" – that is, to convert the parametric stack object into a single, explicit mesh. This is often necessary to avoid bugs and glitches that can arise from a complex stack. As well, it ensures that the object will not change unexpectedly, and speeds the program’s behavior by reducing real-time overhead. Collapsing is not undo-able! – to do collapse, choose "Collapse All". The "Collapse To" option allows part of the stack to be collapsed, while the rest remains.
As well, there are some very useful features here that allow the order of modifiers to be changed. This can be important, as is shown in the next section.
Using Modifiers
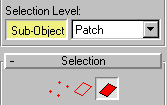
 In the name of practice, convert it into a Patch, open the Patch level sub object, select one side of the object, and extend it into a fairly complex shape after the fashion of the one shown here.
 Find "Bend" in the Modifier list, or if you can’t find it there, click the "More" button, and find "Bend" in the that list. Click Bend, and the rollout shown here should appear.
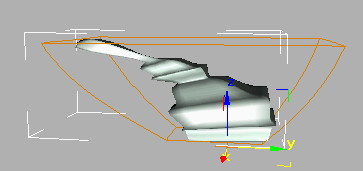
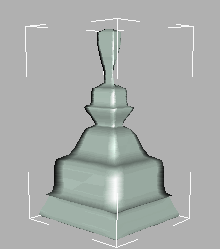
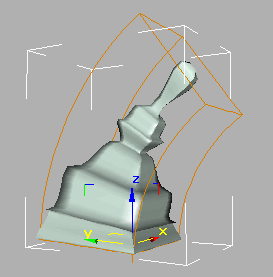
You should now have something like the squished blob shown here. Note in each image how the current Modifier is represented visually by an amber "box" – the shape of the box is the shape of the current deformation.
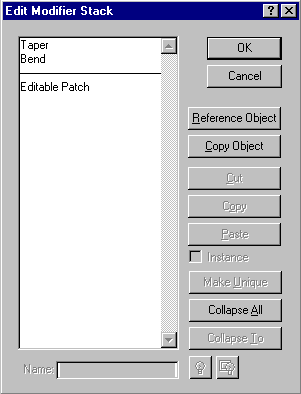 Click on the Edit Stack button to open the "Edit Modifier Stack" Panel, as shown here. Your list should look pretty much exactly like the one shown here. The items at the top of the list are the most recently added, while the one at the bottom of the list are the oldest ones. To see the effect of changing the order of the stack, select the item "Taper". Choose "Cut", and then
 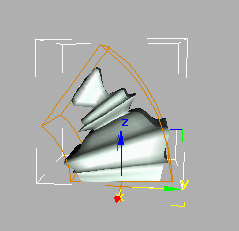 This should reverse the order of the Bend and Taper Modifiers – meaning that Taper will then be applied before Bend, instead of the other way around, as shown here.
If the change is not readily apparent (compare the image here with the last one on the previous page), try selecting Undo/Redo to see what effect changing the order of these two items in the stack. This can be a very useful feature.
Save, if you want to keep this lump, and…
Just for the heck of it, open the "Edit Modifier Stack" Panel again, and choose "Collapse All". After you’ve done this, you should see no visible change in the object. However, take a look at the stack – you should see that all of the items that were once there are gone, and only the item "Editable Mesh" remains – an editable mesh is all that is normally left after a "Collapse All" operation – the previous contents of the stack are gone forever.
There are a few other Modifiers whose functions are similar to the ones we’ve looked at – esp. the "Twist" Modifier. Experiment with the tools you know how to use – the Bend, Twist, Taper, etc. tools – until the operation of them is easy. These tools are often useful, if you understand the operation of them.